

How to add custom image sizes in WordPress
Do you want to add custom image sizes in WordPress? Here in this article, we will guide you the easiest way to add custom image sizes in WordPress.
Sometimes it is important for the website owner to upload the image and edit images in their required sizes. WordPress has its own default image sizes available. So when you upload an image in WordPress it will create additional files for all different sizes. So if you have your own custom size image then it will save your valuable time to edit the images.
Add custom image sizes in WordPress
Adding custom images in WordPress is an advanced process. You need to change and add some code in your core theme file. So you need to make a backup of your website. If anything goes wrong you don’t lose your important data or information. You can check this article for the best backup plugins for WordPress.
Step 1
Edit function.php file
At first, you need to edit and add some code to your theme’s function.php file. To add the code in your function.php file login to your WordPress website and then go to Appearance > Theme Editor. Here you will find your theme’s function.php file. You just need to add this little code snippet on that.
add_theme_support( 'post-thumbnails' );
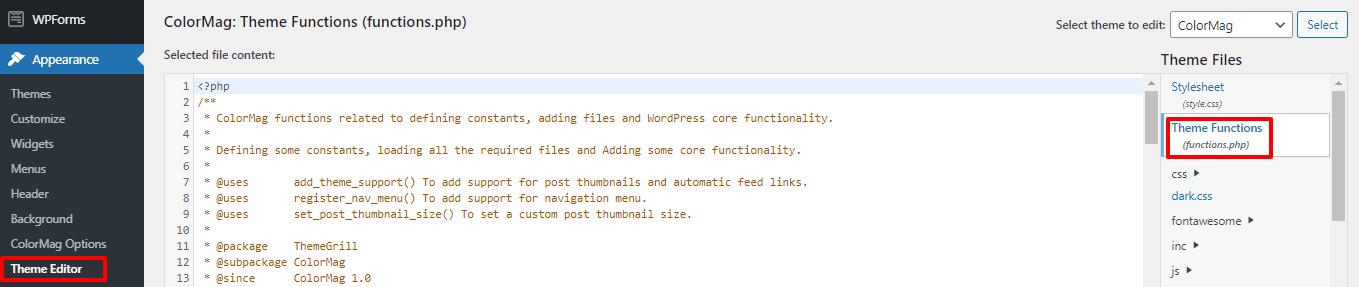
After adding the code don’t forget to click on the Update File button. This little code will enable you to add custom image sizes in WordPress.
Step 2
Add code in the theme file
You just add a custom image size in now you need to display the custom image sizes in your WordPress theme. Open your theme file and under the Post Loop add the following code snippets.
add_image_size( ‘post-thumbnail size’, 700, 340 );
Here you can replace the post-thumbnail with your image name and add the image size you want to add. Adding this code to your theme file will display the custom image size.
Step 3
Regenerate old image size
Now you need to regenerate old uploaded images into the new image size. For this, you need to use a plugin. here we are using the Regenerate Thumbnails WordPress plugin. This plugin will convert all your previously uploaded images into the new size you added.
Install and activate the plugin and then go to Tools > Regenerate thumbnails. Here on this page, you will see two options. You can regenerate all of your images or you can only regenerate your featured images. Click on the button you want to regenerate.
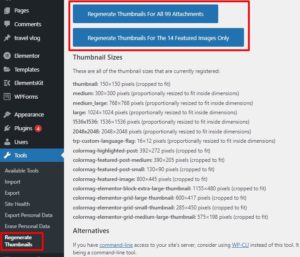
Your selected images will convert into the new image size you added.
Step 4
Add custom image size in WordPress post insertion
You need to use the sample Image Size WordPress plugin to add an additional image size option in WordPress post insertion.
Install and activate the plugin and then go to Setting > Media. Here you need to check Show in post insertion? option.
It will add the image size in post-insertion.
Wrapping up
We hope this article will help you. You can also see our other articles to learn How to Require an Email Address to Download a File in WordPress
How to Fix Too Many Redirects Error in WordPress
If you like this article please like our Facebook Page to stay connected.